As with any home improvement project, planning is your best friend. It takes some time and teamwork with your significant other to effectively plan your home life but then throw on top of that a long awaited project and it can mean chaos. You’ve got your career, children and their schooling and activities, the dog, and all the day to day activities, and you’ve gotten yourself into one fine mess! Well, we’re here to tell you that you’d better get ready for some planning for a paver project and look at the entire scope, future plans and possible things underground that can be areas of concern going forward.
Well, now back to the planning part. A paver installation project is an interesting home project because there as so many other factors that need to be considered because they go hand in hand with pavers. Paver installation, service, repair or removal ALL intertwine with potentially costly other areas of your home that need your full attention before you embark on this type of project.
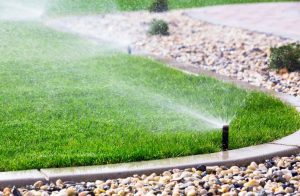
For example, when laying pavers, stone, concrete, brick or any other type of surface material, the entire home area must be considered. The paver or material you decide to use will cover the ground and what is under ground. Well, for starters, your entire sprinkler system lies under the ground. You sure don’t want to have to remove those freshly laid pavers, when you find out you forgot to address the sprinklers, a leak or their removal.
What else. Well in most areas, your natural gas lines are under ground and need to be located and accounted for before you begin any type of land covering project like this. This is a common mistake all homeowners make when planning a home paver project.
What else can go wrong? How bout your home lighting in the backyard? Many of the older type of lights in backyards have electric lines and wires underground and these need to be accounted for as well.
There are others that we won’t go into now, but you can see how covering an area of your land, can have severe consequences if you don’t plan ahead and account for potential disasters.
Surface projects and paver installation requires its own collection of experts to help in the process. From determining what surface to use, where to put the material, how much to spend and who to select to oversee and complete the work is a difficult process for anyone.
Fortunately, there are many online resources to fall back on when doing your preliminary research and looking into what will work best for the answers to all those daunting questions above.
For starters, get your notepad and pen out (or your trusty iPhone) and get ready to take notes. The first, and obvious place to begin, is Home Depot. Home Depot is a giant in the home improvement world and is a great first resource to get your feet wt and learn about all the options available for home paver projects.
A second resource is Floors & Decor. This is a growing chain but they have knowledgeable help on site and the options to get help with your project just like Home Depot.
These are both very solid educational resources to begin your quest and start asking questions and shopping pricing. As I mentioned earlier, both of these chains have on-site personnel to assist you in selecting the hard materials you’ll need to finish the project and avoid any potential pitfalls as well.
Lowe’s is also another top place to consider looking into when planning any project or improvement of any kind. They are located throughout the United States and have similar resources to Home Depot and Floors & Decor.
Regardless of which home improvement chain you select, they are all very similar and offer great services. You can also check online for buying materials in bulk and check their delivery fees. The most important thing you can do is shop around and don’t be afraid to ask a lot of questions.
You will learn the ins and outs of each project and be better prepared each and every time you go out to tackle one head on.
Are you planning a tight and solid driveway? Read below our step-by-step plan with useful tips in advance and between the steps with which you directions not be faced with surprises afterward. Buy driveway paving? Then take a look at the page pavement paving for paving stones, small rocks, thick format, and webbing stones.
Step 1 – Preparation For A Ramp
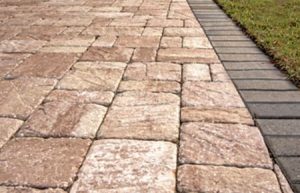
For laying a driveway, we recommend clinkers with a thickness of at least 6 cm, preferably choose 7 cm thickness. This ensures that the slope does not sag when a vehicle drives over it. Under the category of paving in our webshop, various types of wall, thick format, and vowels with a thickness of at least 6 cm can be found. For driveways that are heavily used by heavy vehicles, we always recommend choosing a thicker compressed format. Many leggings are possible for laying paving. We recommend, however, to use the herringbone leg bandage (or possibly the elbow leg bandage). This ensures optimum distribution of pressure across the surface.
To calculate the number of vowels needed, you can measure the area of the area to be paved. Think about the cutting loss. We assume an average cutting loss of 8% for the herringbone laying bond.
Set the area you want to pave with pickets. Indicate on these pickets at which height the final vowels should be located. It is advisable to start from a fixed point such as your garage or house.
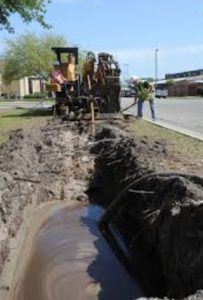
Step 2 – Digging
For excavating heavily loaded places like a driveway, an excavation of at least 20 cm is required, but we prefer 25 cm. To prevent any puddles on your street, you can dig 1 centimeter deeper after digging every meter. This ensures that the ramp runs out slightly and no water is left on it. If you need to bridge a more considerable height, it is wise to apply a layer of rubble grit as a substrate under your driveway and then, for example, 20 cm of sand. Puingranaat is a solid underlayer; you should also vibrate with a vibrating plate.
Step 3 – Concrete Tires / Side Closures
Place the concrete belts along the edge of the surface to be paved, to determine the correct distance we recommend first to lay a row of clinkers. Make sure there is enough depth, and we recommend 8 cm wide retaining straps to prevent possible shifting of the vowels. These concrete belts are also for sale in our webshop. Then place the concrete belts in lean cement (= 1 part cement with 5 to 7 parts sand) 2 centimeters lower than the stones to be placed. This prevents the concrete tires from coming out above the paving.
Step 4 – Underground
Always place the vowels higher than the adjoining surface. After all, you will continue to vibrate; this ensures that your vowels will still drop about 1 cm. Moreover, this provides that sand rinses off the driveway instead of on it. Ensure that the surface drains sufficiently, this can be done by using concrete rubble as a substrate or by drilling holes in a dense cover. Then fill these holes with a drainage hose filled with concrete debris or gravel. For the best water drainage, we recommend a concrete rubble substructure.
Step 5 – Stabilize
To ensure that your driveway eventually comes to lie flat, you must make the subfloor stable. For this, it is possible to use a stabilizing mixture of pure washed river sand with cement (1 part cement with 5 to 7 parts sand). To prevent the mixing of large amounts of sand with glue, you can also sprinkle the cement layer over the sand afterward. Then you can rake the adhesive a few centimeters deep through the sand. Be careful, however, that no water comes to the sand/cement. If this happens, the sand bed can become hard before you have put the vowels. Bear in mind that when the driveway drifts, the sand layer can still drop by 10 to 15%.
Step 6 – Laying Vowels
When you have completed the first five steps, you can start laying the vowels. A tip here is to start from the street work (where you will find packs of stones). This prevents the net stabilized sand bed from being damaged during the laying of the vowels. We also recommend that a joint of one millimeter be maintained between each brick. This is already taken into account with our concrete paving blocks using the spacers, which protect your driveways extra, on the vowels. After laying the vowels, sweep the ramp with sand. This fills the joints that you have left open. You can then vibrate the clinkers with a vibrating device, choose a vibrating plate with a rubber mat for extra protection, and your driveways will then drop about 1.5 cm.
Step 7 – Filling in And Sowing
After vibrating again, apply to sand on your driveway and let the wind and sweeper do the work for a few weeks. If necessary, add sifted sand, again and again, this process we recommend taking six weeks. Make clear with a stack of pallets or stones that your driveway is not yet accessible to cars. To prevent traces, it is also wise to always park your car on your street in different ways.


 To calculate the number of vowels needed, you can measure the area of the area to be paved. Think about the cutting loss. We assume an average cutting loss of 8% for the herringbone laying bond.
 To ensure that your driveway eventually comes to lie flat, you must make the subfloor stable. For this, it is possible to use a stabilizing mixture of pure washed river sand with cement (1 part cement with 5 to 7 parts sand). To prevent the mixing of large amounts of sand with glue, you can also sprinkle the cement layer over the sand afterward. Then you can rake the adhesive a few centimeters deep through the sand. Be careful, however, that no water comes to the sand/cement. If this happens, the sand bed can become hard before you have put the vowels. Bear in mind that when the driveway drifts, the sand layer can still drop by 10 to 15%.